I stumbled upon pressed flower clay art completely by accident. My gardening shears slipped, and I ended up with a handful of perfect blooms that seemed too beautiful to toss. So there I was, flowers in one hand and a block of air-dry clay in the other, when inspiration struck. That was three years ago, …
I stumbled upon pressed flower clay art completely by accident.
My gardening shears slipped, and I ended up with a handful of perfect blooms that seemed too beautiful to toss. So there I was, flowers in one hand and a block of air-dry clay in the other, when inspiration struck.
That was three years ago, and I’ve been embedding botanical finds in clay ever since.
It’s surprisingly simple yet endlessly satisfying. You don’t need fancy equipment or professional training—just curiosity and patience. The way gentle petals preserve their color and form beneath the clay’s surface still amazes me.
Sometimes the simplest crafts bring the most joy, and this one connects me to nature in the most unexpected way.
Ready to try it yourself?
The Lifespan of Pressed Flowers in Clay
One of the most common questions I get is “How long will my pressed flower clay pieces last?”
The answer isn’t straightforward, but I can share what I’ve learned through experience and research.
Factors Affecting Longevity
The lifespan of pressed flowers in clay depends on several key factors:
- Flower Type – Some flowers naturally preserve better than others. Gentle blooms with thin petals (like cosmos) tend to maintain their color and shape longer than thick, water-filled flowers (like succulents).
- Drying Method – Flowers that are properly pressed and completely dried before embedding will last significantly longer. Any remaining moisture can lead to mold or deterioration.
- Clay Medium – Air-dry clay typically offers less protection than polymer clay, which creates a more airtight seal when baked.
- Sealant Used – A high-quality sealant can dramatically extend the lifespan by protecting against moisture, UV light, and air exposure.
- Display Environment – Pieces kept away from direct sunlight and humidity will maintain their beauty much longer.
Average Timeframes
In my experience, the lifespan of pressed flowers varies significantly based on the clay type and sealing method used.
Without proper sealing, air-dry clay pieces typically last about 1-2 years before you’ll notice fading, while polymer clay pieces hold up better, showing significant color changes only after 2-5 years.
The difference is quite dramatic when you add professional sealing to the equation.
Properly sealed air-dry clay creations can maintain their beauty with minimal fading for 3-7 years. Polymer clay pieces are the most durable option, often preserving your flowers’ appearance for 5-10+ years when sealed correctly.
Tips for Maximum Preservation
I’ve found these practices help extend the lifespan of my pressed flower clay creations:
- Always use fully dried flowers (at least 2-3 weeks pressed between absorbent paper)
- Apply multiple thin layers of UV-resistant sealant rather than one thick coat
- Store or display pieces away from bathroom humidity and kitchen steam
- Consider pressed flower pieces as semi-permanent art rather than permanent heirlooms
- Document your favorite pieces with photos when they’re freshly made
Remember that part of the beauty of pressed flower art is its connection to nature’s cycles.
Even as colors gently fade over time, your pieces take on a lovely vintage quality that has its own special charm.
Best Flowers for Pressing in Clay

Not all flowers are created equal when it comes to pressing and preserving in clay.
After plenty of trial and error (and some spectacular failures), I’ve found out which blooms work beautifully and which ones are best avoided.
Flowers That Press Beautifully
Thin, Naturally Flat Flowers:
These stars of the pressing world maintain their color and shape wonderfully in clay:
- Pansies and violas
- Forget-me-nots
- Queen Anne’s lace
- Larkspur and delphiniums
- Cosmos
- Small daisies and chamomile
Gentle Wildflowers:
I’ve had great success with these meadow beauties:
- Buttercups
- Clover blossoms
- Wild geranium
- Bluebells
- Sweet alyssum
Foliage That Adds Texture:
Don’t overlook these non-floral elements:
- Fern fronds (especially maidenhair ferns)
- Small leaves from herbs like thyme and mint
- Skeleton leaves
- Grasses with interesting seed heads
Flowers to Avoid
I’ve learned the hard way that some flowers just don’t work well in clay!
Avoid thick or watery varieties like succulents, tulips, daffodils, zinnias, and bulky orchids – they never dry properly.
Color retention is another challenge, particularly with red flowers that often shift to blue tones over time, and both African violets and irises tend to lose their lively hues altogether.
Trust me, saving yourself these frustrations will make your clay flower expedition much more enjoyable.
My Personal Favorites
After years of experimenting, I always return to these reliable performers:
- Bachelor’s buttons (cornflowers) – their blue stays remarkably true
- Japanese maple leaves – perfect size and intricate shapes
- Verbena – tiny clustered flowers that press flat naturally
- Sweet peas – the gentle petals preserve their subtle colors beautifully
- Lobelia – those tiny blue flowers create perfect miniature accents
Remember that flowers picked at their peak (not fully mature) generally press better than those that are fully open or starting to fade.
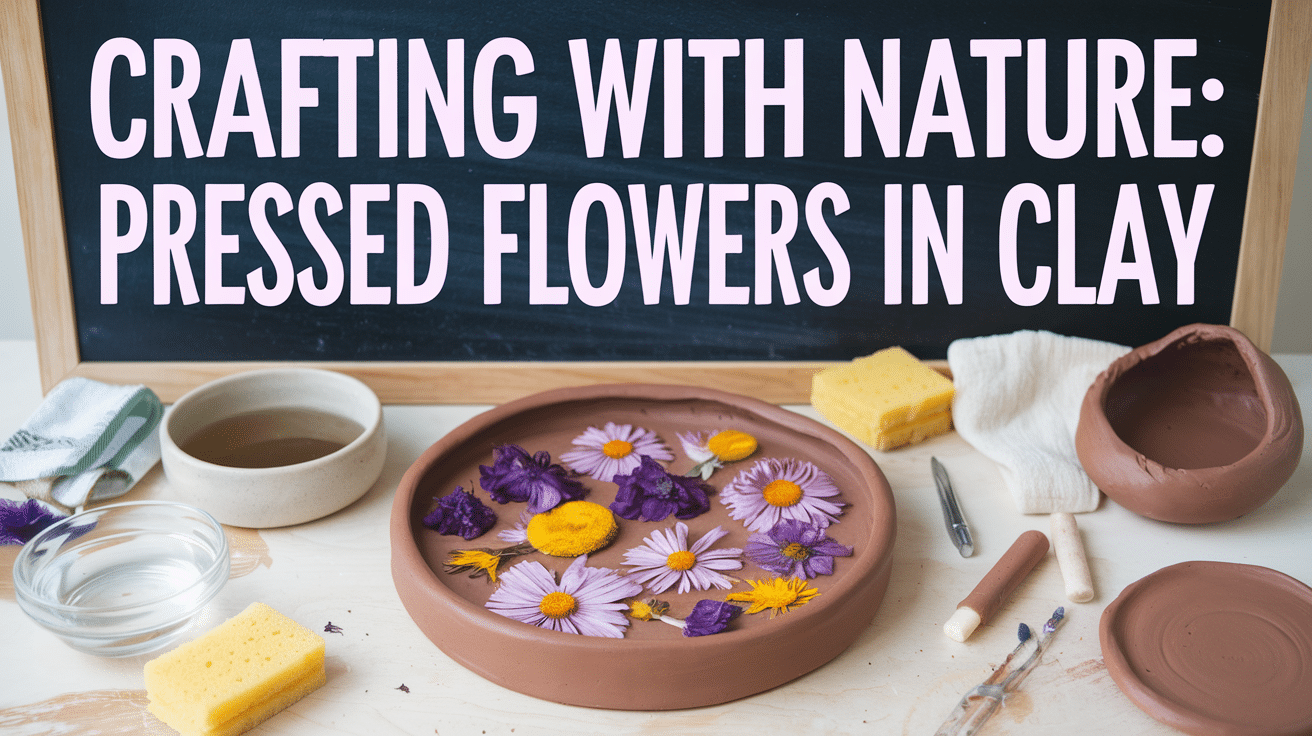
Essential Tools Required for Pressing Flowers in Clay
| Item | Purpose |
|---|---|
| Baking Soda | Main ingredient for air-dry clay |
| Cornstarch | Helps create a smooth texture |
| Water | Needed to form and bind the clay mixture |
| Mixing Bowl | For combining ingredients |
| Saucepan | To heat and thicken the clay mixture |
| Spatula or Spoon | For stirring the mixture while cooking |
| Parchment Paper | Prevents clay from sticking while rolling |
| Rolling Pin | Used to flatten the clay evenly |
| Cookie Cutters | To shape the clay pieces |
| Compostable Straw or Skewer | To create holes for hanging |
| Oven (Optional) | Speeds up the drying process |
| Pressed Flowers | Decorative elements |
| Matte Mod Podge | Adhesive and protective seal for flowers |
| Paintbrush | To apply Mod Podge evenly |
| String/Ribbon (Optional) | For hanging ornaments |
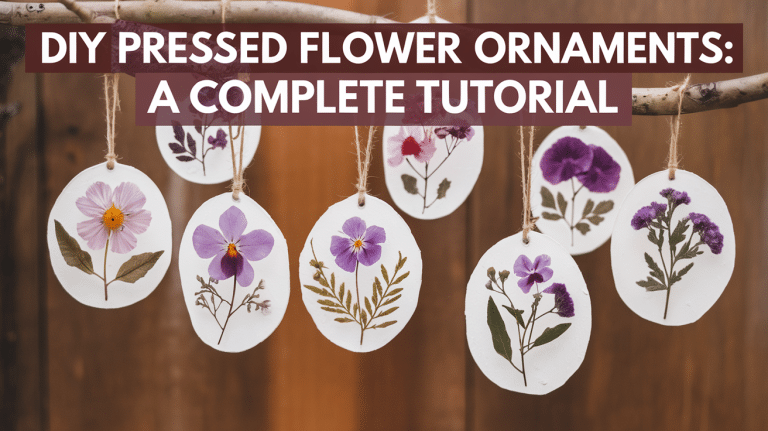
How to Create Pressed Flowers in Clay
Create beautiful, nature-inspired clay decorations with pressed flowers—perfect for gifts, ornaments, or simply adding a touch of charm to your space!
Here’s how:
Step 1: Gather Your Materials

Before you begin, it’s important to have all your materials ready to make the process smoother and more enjoyable.
You will need air-dry clay (either homemade or store-bought), baking soda, cornstarch, water, a mixing bowl, a saucepan, and a wooden spoon or spatula. Other essentials include a rolling pin, parchment paper, cookie cutters or shaping tools, a skewer or straw for making holes, and pressed flowers for decoration.
To seal and protect the flowers, you’ll need Matte Mod Podge and a paintbrush.
If you plan to hang your creations, ribbon or twine is also useful.
Gathering everything in advance ensures a seamless crafting experience.
Step 2: Prepare the Air-Dry Clay

Creating the perfect clay consistency is key to a smooth and workable texture.
Follow these steps carefully to ensure your clay is easy to roll and shape.
- In a mixing bowl, combine 2 cups of baking soda and 1 cup of cornstarch. Stir thoroughly to evenly distribute the dry ingredients.
- Gradually add 1¼ cups of water while continuously mixing to avoid lumps.
- Once fully combined, transfer the mixture to a saucepan and place it over low heat.
- Stir constantly using a spatula or wooden spoon. As the mixture heats up, it will begin to thicken.
- Continue stirring until the texture resembles mashed potatoes—thick but still pliable.
- Remove the saucepan from the heat and let the clay cool for about 5-10 minutes, until it is warm but comfortable to touch.
- If the mixture feels too dry, add a teaspoon of water at a time and knead it in until it reaches a smooth, dough-like consistency.
Once your clay is ready, it’s time to roll it out and start shaping!
Step 3: Roll Out the Clay

Rolling the clay evenly is crucial for creating durable decorations that dry properly without cracking.
- Prepare your workspace by placing a sheet of parchment paper on a flat surface. This prevents sticking and makes cleanup easier.
- Take a portion of the cooled clay (about the size of a small handful) and place it between two sheets of parchment paper.
This will help keep the surface smooth and prevent the clay from sticking to your rolling pin.
- Using a rolling pin, gently roll out the clay and apply even pressure to achieve a uniform thickness.
- The ideal thickness is about ¼ inch—thick enough to stay sturdy but not so thick that it takes too long to dry.
At last,
- If the edges appear rough or uneven, you can smooth them out by gently pressing with your fingers or using a damp sponge.
- Check for air bubbles—if any appear, lightly press them out before proceeding.
Now that your clay is rolled out, you’re ready to cut out your desired shapes and begin crafting your unique pressed flower decorations!
Step 4: Cut Out Shapes

- Select a cookie cutter or shaping tool to cut out the clay decorations in your desired shape.
- Press the cutter firmly into the clay and carefully lift it to reveal a clean cut.
- Remove any excess clay and set it aside to be reused.
- If needed, use a small knife or sculpting tool to refine the edges of your cutouts.
This step gives your clay pieces their final shape before adding details.
Step 5: Create Hanging Holes

If you plan to turn your clay pieces into ornaments or gift tags, you’ll need to create holes for hanging.
Using a compostable straw, skewer, or toothpick, carefully make a small hole near the top of each piece. Be mindful not to place the hole too close to the edge, as this could cause the clay to crack or break when handling.
To ensure the hole is large enough for threading ribbon or twine later, gently rotate the skewer or straw while making the hole. This small but essential step allows you to easily display or hang your clay decorations once they are finished.
Step 6: Dry or Bake the Clay

You have two options for drying your clay pieces:
Air-Drying Method:
- Lay the clay pieces on a flat surface and allow them to dry naturally overnight or for at least 24 hours.
- Flip them over halfway through the drying process to ensure even drying.
Baking Method:
- Preheat your oven to 200°F (93°C).
- Place the clay pieces on a parchment-lined baking sheet.
- Bake for 45 minutes to an hour, checking periodically.
- If the back still feels slightly damp after baking, allow them to continue drying at room temperature.
Once dry, they should feel hard and lightweight, ready for decorating!
Step 7: Arrange and Attach Pressed Flowers

Once the clay pieces are fully dried and cooled, select your pressed flowers.
Next, arrange them on the surface until you are happy with the design.
Then, using a brush, apply a thin layer of Matte Mod Podge to secure the flowers in place.
Finally, let it dry completely before applying a second coat for added durability.
Step 8: Final Touches and Enjoy

Once fully dried, your clay decorations are ready to be displayed or gifted.
You can thread a ribbon through the holes to hang them as ornaments, use them as place markers, or simply admire your beautiful handmade creations!
For a more detailed tutorial on how to create pressed flowers in clay, check out the video below:
Mistakes to Avoid Pressed Flowers in Clay
Mistake 1. Rushing the Pressing Process
The most common mistake I see beginners make is not properly pressing their flowers.
I once tried to use flowers I’d only pressed for three days, and they continued to release moisture after being embedded in clay, causing mold and discoloration.
Give your flowers at least 2-3 weeks between absorbent papers, changing the papers every few days to draw out all moisture.
Mistake 2. Using Flowers That Aren’t Completely Dry
Trust me on this one – if your flower feels even slightly cool or soft to the touch, it’s not ready.
I’ve ruined entire batches by embedding flowers that seemed dry but weren’t quite there. A properly pressed flower should feel papery and crisp. When in doubt, press it for another week.
Mistake 3. Poor Clay Preparation
I learned this mistake after watching my first few pieces crack within days. Properly conditioning your clay is crucial:
- Air-dry clay should be evenly moistened and worked until pliable
- Polymer clay needs thorough kneading to remove air bubbles
- Always start with clean hands and tools to avoid contaminating the clay
Mistake 4. Insufficient Sealing
My early pieces faded within months because I skipped proper sealing.
Whether you’re using air-dry or polymer clay, a good sealant is non-negotiable. I apply at least 3-5 thin coats of a UV-resistant sealant, allowing each layer to fully dry before adding the next.
Mistake 5. Exposing Finished Pieces to Harsh Conditions
After putting all that work in, I’ve seen pieces ruined by placing them in direct sunlight or humid environments. Even with good sealing, pressed flower pieces should be displayed away from:
- Direct sunlight
- Bathrooms or kitchens with high humidity
- Areas with temperature fluctuations
- Places where they’ll be frequently handled
Mistake 6. Using Low-Quality Materials
I tried to save money when I started by using bargain clay and sealants. The results disintegrated within months. Quality materials make a huge difference – especially with clay, pressing papers, and sealants.
Remember, every mistake is just part of the learning process. My failed pieces taught me just as much as my successes, so don’t get discouraged if things don’t turn out perfectly at first.
Just keep pressing on (flower pun intended)!
Creative Ways to Display Pressed Flowers in Clay

Pressed flower clay decorations are a charming way to preserve nature’s beauty while adding a personal touch to your space. Beyond traditional ornaments, there are countless creative ways to display these intricate pieces.
Whether you prefer functional decor or purely artistic designs, here are some unique ideas to showcase your pressed flower clay creations.
Hanging Wall Art: Transform your pressed flower clay pieces into stunning wall displays.
Arrange multiple clay discs or tiles in a pattern and mount them on a wooden board or directly onto the wall using adhesive strips. To enhance the aesthetic, mix different flower types and sizes for a versatile composition.
Personalized Jewelry: Create unique pendants or earrings using smaller clay pieces embedded with pressed flowers. Drill a tiny hole before drying the clay, then attach jump rings and chains to turn them into necklaces or dangle earrings.
Seal with a protective finish to preserve the flowers and keep the jewelry long-lasting.
Custom Coasters: Pressed flower clay coasters make for a beautiful and functional display.
Cut your clay into uniform circles or squares, press flowers into the surface, and seal with a waterproof varnish or resin for added durability.
These coasters not only add grace to your table but also make for wonderful handmade gifts.
Decorative Magnets: Add a touch of nature to your fridge or workspace by turning your pressed flower clay pieces into magnets.
Simply glue small, strong magnets onto the back of dried clay decorations. This is an easy way to create miniature botanical artworks that brighten up any metallic surface.
Table Place Cards or Name Tags: For special occasions like weddings, garden parties, or tea gatherings, use pressed flower clay decorations as unique place cards.
Write guests’ names on them with a fine-tipped permanent marker or use letter stamps before drying.
These pieces double as keepsakes for attendees to take home.
Window Suncatchers: If you prefer a more airy display, hang your pressed flower clay pieces near windows where they can catch the light.
While clay isn’t transparent, the flowers within will still create a soft, rustic charm when illuminated by sunlight. Use dainty twine or ribbon to hang them from suction hooks on glass surfaces.
Wrapping It Up
As you commence your pressed flower clay escapade, remember that patience is your greatest tool.
The perfect pansy that takes weeks to press properly will reward you with years of enjoyment in your finished piece.
Start simple, celebrate small successes, and don’t be discouraged by early mishaps—they’re valuable lessons in disguise. What begins as a curious experiment often blossoms into a fulfilling creative practice that connects you with nature’s fleeting beauty in a tangible, lasting way.
Whether you’re preserving memories from your garden or capturing wildflowers from a special hike, each piece tells a story uniquely yours.
Now, with flowers at the ready and clay in hand, what will your first creation be?