I've calculated that making edible arrangements at home saves 70% on costs. While stores charge $75-$100 for a medium fruit arrangement, I make the same size for $20-$25 using fresh fruits from local markets. When stored properly, my homemade versions stay fresh for 3-4 days. After creating over 50 fruit arrangements, I've perfected a beginner-friendly …
I’ve calculated that making edible arrangements at home saves 70% on costs.
While stores charge $75-$100 for a medium fruit arrangement, I make the same size for $20-$25 using fresh fruits from local markets.
When stored properly, my homemade versions stay fresh for 3-4 days.
After creating over 50 fruit arrangements, I’ve perfected a beginner-friendly method. This tutorial breaks down my process using common kitchen tools: a sharp knife, skewers, and a vase.
I’ll guide you through my step-by-step process for making fruit bouquets.
You’ll learn practical tips for creating beautiful, budget-friendly edible gifts, from choosing the best fruits for arrangements to basic cutting patterns.
The Art of Budget-Friendly Edible Arrangements
Creating a budget-friendly DIY edible arrangement is a fun and creative way to make a beautiful fruit bouquet without spending a lot of money.
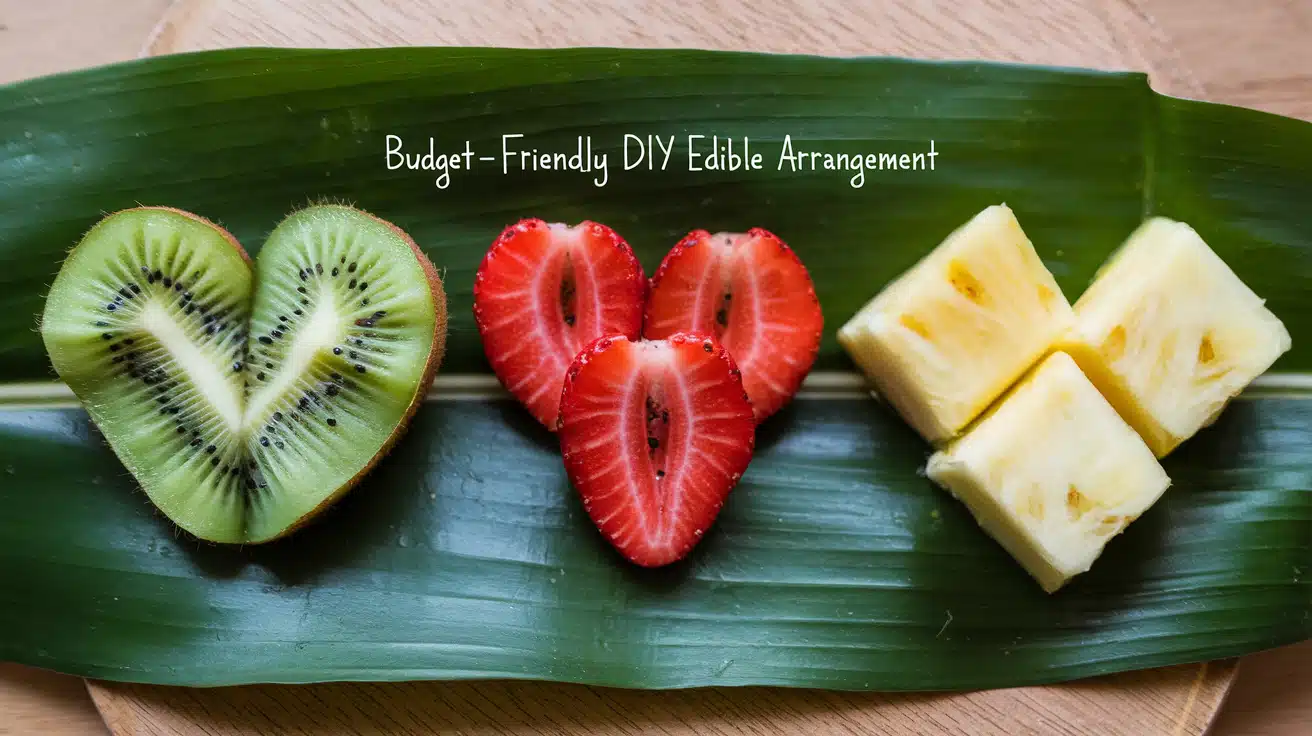
Using fresh, seasonal fruits like pineapple, strawberries, and grapes, you can create an eye-catching centerpiece for any occasion.
You can assemble your arrangement in steps with simple tools, like wooden skewers and a Styrofoam sphere.
It’s affordable, and you can customize your arrangement with your favorite fruits.
Plus, it’s a healthy and tasty option that everyone will enjoy.
This DIY edible arrangement is perfect for birthdays, Mother’s Day, or a special treat for yourself!
DIY Edible Arrangements: Here’s How I Make Mine
Let me share a way of creating a beautiful edible arrangement!

Here’s everything I use and how I make it:
My Go-To Items
| What I Have in My Kitchen | Fresh Items I Buy |
|---|---|
| – My favorite glass vase | – A ripe pineapple |
| – Cookie cutter (I love the flower shape) | – One cantaloupe |
| – Wooden skewers (10-inch ones work best) | – Fresh strawberries |
| – My trusty chef’s knife | – A bunch of red grapes |
| – Regular cutting board | – Fresh kale bunch |
| – Kitchen scissors | – Chocolate melts |
| – Baking sheet | – A pretty ribbon |
| – Paper towels | |
| – Microwave bowl | |
| – Parchment paper | |
| – 4″ styrofoam ball | |
| – My glue gun |
1. Setting Up My Base

First thing I do is get my base ready. I grab my glue gun and generously coat the inside rim of my vase (I’ve learned the hard way that skimping on glue leads to disasters!).
Then I pop my styrofoam ball into the vase – I make sure it’s sitting halfway in and hold it steady for about 30 seconds.
I usually give it a gentle wiggle test to make sure it’s really secure.
2. Getting My Fruits Ready

I always start by washing everything super well.
For my pineapple (my favorite part!), I slice off the top and bottom, then cut it into nice ½-inch slices.
I use my flower cookie cutter on these slices – it makes the prettiest shapes!
When I do my cantaloupe, I cut it in half, scoop out all the seeds, and slice it into wedges like a pizza.
I carefully trim off the rind. For strawberries, I just pop off the stems, and with grapes, I pluck them from their stems.
3. Making My Chocolate-Dipped Strawberries
This is where I get a bit fancy!
I melt my chocolate in 30-second bursts in the microwave, stirring between each time. I’ve found that holding the strawberry by its tip and giving it a quick dip works best.
I tap it gently on the side of the bowl (just a couple of taps) to get rid of extra chocolate, then put it on my parchment paper.
I usually let these sit for about 20 minutes until they’re completely set.
4. Setting Up My Skewers

I like to mix things up here!
On some skewers, I put my pineapple flowers; on others, I cluster 4-5 grapes together. I make sure to space out my chocolate-covered strawberries because they’re kind of like the stars of the show.
I push each piece firmly onto the skewer – nothing worse than sliding fruit!
5. Creating My Design

I find it easiest to think of my arrangement like a clock face when I’m putting it together.
I usually start with a nice pineapple flower at 12 o’clock, then work my way around, mixing up the fruits as I go. I stick the skewers in at slightly different angles – it gives the whole thing more depth.
I always take a step back every now and then to make sure everything looks balanced.
6. Adding My Special Touches

Last but not least, I tuck pieces of kale into any empty spots – it makes everything look so much fuller and more professional!
Then I finish it off with a big, beautiful bow around the vase. I’m not the best at making bows, so sometimes it takes me a couple of tries to get it just right, but it’s worth it for that perfect final touch!
I love keeping my arrangement in the fridge until about an hour before I need it.Trust me, it’s such a hit every time I make it –people always think I bought it from a fancy shop!
Other Top Two Recommendations for DIY Edible Arrangements
DIY Edible Arrangement 1: Simple and Easy Steps

Creating your edible arrangement at home is not only fun but also budget-friendly!
Follow these easy steps to make a beautiful and tasty arrangement that looks as good as it tastes.
Would you be ready to jump in?
Step 1: Gather Your Tools and Materials
Before you start, please make sure you have everything you need. The right tools will make your job easier, and you’ll be able to create an impressive arrangement in no time.
| Tools & Materials | Details | Estimated Budget |
|---|---|---|
| Fresh Fruits | Strawberries, grapes, pineapples, melons, and blueberries. | $15 – $25 |
| Skewers & Toothpicks | For holding the fruit together. | $2 – $5 |
| Floral Foam | To keep the skewers in place. | $2 – $4 |
| Vase or Basket | For the base of your arrangement. | $3 – $8 |
| Cookie Cutters | For fun shapes (hearts, stars, etc.). | $5 – $10 |
| Tissue Paper or Decorative Paper | To cover the foam and add color. | $1 – $3 |
| Chocolate (optional) | For dipping strawberries or adding a drizzle. | $3 – $6 |
| Parchment Paper | To prevent chocolate from sticking. | $1 – $3 |
Total Estimated Budget: $32 – $64
Step 2: Prepare the Floral Foam
Start by cutting the floral foam to fit your vase or basket. It’s important to make sure the foam fits snugly, so the skewers stay in place. You can use a knife or even a cookie cutter to shape the foam to the size you need.
Tip: Use tissue paper or decorative paper to cover the foam for a neat look. This helps hide the green foam and gives it a polished finish.
Step 3: Prep the Fruits
Wash your fruits thoroughly. Cut the pineapples and melons into slices or fun shapes using cookie cutters. You can make hearts, stars, or even flowers for a unique touch.
For smaller fruits like grapes and strawberries, you can leave them whole or cut them into halves, depending on your preference.
Step 4: Arrange the Skewers
Now it’s time to start building your edible arrangement! Take your skewers or toothpicks and start threading the fruit onto them.
Start with larger pieces like pineapple and melon, and then add smaller fruits like grapes and berries. Be creative with your arrangement and alternate colours for a vibrant look.
Step 5: Add Chocolate for Extra Flavour (Optional)
If you want to elevate your arrangement, consider dipping some of your fruit, like strawberries, in melted chocolate. Dark, milk, or white chocolate works well.
Remember to use parchment paper under the dipped fruit to prevent it from sticking to the surface as it hardens.
Step 6: Assemble the Arrangement
Once all your fruit is threaded onto skewers, it’s time to assemble the arrangement. Place the floral foam into your vase or basket, and start sticking the skewers into the foam.
Try to vary the heights of the skewers to create a layered effect, making the arrangement look fuller.
Step 7: Final Touches
Take a step back and look at your arrangement. Add any final touches—perhaps a few more decorative fruits, some chocolate-dipped pieces, or even a few leaves for a fresh look.
Once you’re happy with the arrangement, place it in the fridge until you’re ready to enjoy it.
For more explanation , Go with this tutorial:
DIY Edible Arrangement 2: Valentine’s Day Special

Essential Items Needed:
| Kitchen Tools | Ingredients |
|---|---|
| – Wooden skewers (10-inch) | – Fresh bananas |
| – Microwave-safe bowl | – White chocolate candy melts |
| – Glass or ceramic vase | – Milk chocolate candy melts |
| – 4″ styrofoam ball | – Canola or vegetable oil |
| – Hot glue gun | – Decorative ribbon |
| – Paper towels | – Fresh kale (for filling) |
| – Parchment paper | |
| – Kitchen scissors |
Let me share my personal DIY Edible Arrangement… Here’s how I make these beautiful treats:
1. Preparing Workspace
I always start by laying out parchment paper on my counter and getting my supplies organized. I insert my styrofoam ball into the vase and secure it with hot glue.
This is my foundation, so I make sure it’s super stable!
2. Getting Chocolate Ready Here’s My Special Trick
I add a tiny bit of canola oil to my candy melts before microwaving. I’ve learned this prevents burning and gives me that perfect smooth consistency.
I heat in 30-second intervals, stirring each time until everything’s beautifully melted.
3. Prepping Bananas
I peel and cut my bananas into even-sized pieces. This is where preparation really matters – I pat them dry with paper towels to remove any excess moisture.
Trust me, this makes a huge difference in how well the chocolate sticks!
4. Special Dipping Technique Here’s My Favorite Trick
I first dip a wooden skewer in white chocolate and insert it into each banana piece.
This creates a strong foundation and prevents the banana from falling apart.
The white chocolate sets quickly and acts like a little support system!
5. Chocolate Coating Magic
Once my skewers are secure, I dip each banana piece in milk chocolate, giving it a gentle tap to remove excess.
I love watching that perfect chocolate shell form!
Sometimes I’ll add a little white chocolate drizzle on top for extra flair.
6. Creating the Arrangement
I start placing my chocolate-covered bananas into the styrofoam, varying the heights to create a beautiful round shape.
I work my way around in a circle, making sure everything looks balanced from all angles.
7. Adding Final Touches
I fill any gaps with fresh kale leaves – it makes everything look so lush and professional!
Then I finish with a pretty ribbon around the vase.
Sometimes I’ll add a final drizzle of chocolate over the entire arrangement for that wow factor.
For more explanation , Go with this tutorial:
Pro Tip: I’ve found that keeping my finished arrangement in a cool spot (not the fridge – that makes the chocolate sweat!) helps maintain that perfect chocolate shine until serving time.
Fruits Perfect for DIY Edible Arrangements
Making an edible arrangement at home?
The key is choosing fruits that are fresh, firm, and hold their shape well.
Some fruits wilt, brown, or release too much juice, making them less ideal. Here are the best options based on texture, colour, and shelf life.
Strawberries
- Why They Work: Strawberries are firm, naturally sweet, and their bright red color adds visual appeal. They also last well without refrigeration for a few hours.
- Best Use: Use them whole, cut into halves, or dip in chocolate for a gourmet touch.
Pineapple
- Why They Work: Pineapples are sturdy, juicy, and hold their shape well when cut into slices or decorative shapes. They also provide a tropical flavour.
- Best Use: Slice into rounds or use cookie cutters to create flowers and stars.
Grapes
- Why They Work: Grapes have a thick skin that helps them stay fresh longer. They add contrast to arrangements and don’t release excess juice.
- Best Use: Leave them whole or arrange in small clusters for added texture.
Melons (Cantaloupe & Honeydew)
- Why They Work: Melons are firm, easy to shape, and offer bright orange and green colours. They contain a high water content but still hold their structure well.
- Best Use: Cut into cubes, balls, or decorative shapes to add variety.
Oranges
- Why They Work: Citrus fruits like oranges bring a refreshing, zesty flavour and vibrant colour. Mandarin oranges are especially good because they are seedless and easy to eat.
- Best Use: Use orange slices or individual mandarin segments for a fresh, citrusy touch.
Blueberries
- Why They Work: Blueberries are firm, rich in antioxidants, and add contrast to an arrangement. They don’t brown or leak juice, making them a perfect filler fruit.
- Best Use: Use in clusters or place between larger fruit pieces for balance.
Kiwi
- Why They Work: Kiwi has a striking green color and unique pattern that makes arrangements stand out. It has a firm but juicy texture, ideal for slicing.
- Best Use: Slice into thin rounds or cut into half-moons for a decorative effect.
Apples
- Why They Work: Apples are crisp, easy to slice into shapes, and provide a sturdy base for skewers. However, they can brown quickly if not treated.
- Best Use: Dip slices in lemon juice to prevent browning, then use
By picking the right fruits, your edible arrangement will not only look beautiful but also stay fresh longer.
How Can I Personalize My Edible Arrangement?

Personalizing your edible arrangement makes it extra special. Here’s how to do it simply:
- Choose a Themed Base: Pick a container that matches the occasion. For birthdays or holidays, use fun shaped vases or baskets. You can also wrap the base with decorative paper or add a small label for a personal touch.
- Pick Favorite Fruits: Select fruits the recipient loves, like strawberries, mango, or pineapple. If they have dietary restrictions, choose fruits that fit their needs.
- Cut Fruit Into Fun Shapes: Use cookie cutters to shape fruits into hearts, stars, or flowers. This adds a playful and unique touch to your arrangement.
- Add Garnishes: Fresh mint, edible flowers, or coconut flakes can give your arrangement extra flair. Chocolate-dipped fruit adds a delicious touch.
- Include a Personal Message: Attach a short note or card to the arrangement, or even write a message on the fruit using edible markers.
- Use a Colour Scheme: Coordinate the colours of the fruits based on the occasion—pastels for baby showers, red and green for holidays.
- Incorporate Chocolate: Chocolate-covered fruits like strawberries or pineapple add extra flavour and a fun look.
- Add Small Surprises: Include small treats like candy, chocolate-covered nuts, or mini cupcakes for a sweet surprise.
How Long Do DIY Edible Arrangements Last?
DIY edible arrangements typically last 1 to 2 days when stored in the refrigerator. The cold helps slow down spoilage by reducing oxidation and bacterial growth.
- Chocolate-dipped fruits like strawberries also last about 1 to 2 days, but the chocolate may harden.
- Fruits with high water content, like strawberries and melons, spoil faster, while apples and grapes last longer.
- To prevent browning, dip apples in a lemon juice solution.
Store your arrangement in plastic wrap or an airtight container for the best freshness. For optimal taste and texture, enjoy your arrangement within 1 to 2 days.
Conclusion
Creating DIY edible arrangements doesn’t require professional expertise or a big budget.
With basic kitchen tools, affordable ingredients, and the creative techniques shared in this guide, you can craft impressive fruit displays that rival expensive store-bought versions.
The key is selecting seasonal fruits, mastering simple cutting methods, and arranging them thoughtfully.
Ready to try more budget-friendly food presentations?
We’d love to see your edible creations – share photos of your arrangements in the comments below, or tell us about your favourite fruit combinations!