Ever walked past a home with a gorgeous door decoration and thought, "Wow, I wish my entryway looked that inviting"? I certainly have! That's why I'm excited to share my latest DIY project with you—a stunning pine cone door hanger that's surprisingly simple to make. With just a few materials from your backyard and craft …

Ever walked past a home with a gorgeous door decoration and thought, “Wow, I wish my entryway looked that inviting”?
I certainly have!
That’s why I’m excited to share my latest DIY project with you—a stunning pine cone door hanger that’s surprisingly simple to make.
With just a few materials from your backyard and craft stash, you can modify those ordinary pine cones into a graceful statement piece that’ll have neighbors stopping to admire your door.
Trust me, there’s something incredibly satisfying about creating beautiful decor with your own hands, and this project delivers that feeling in spades.
Ready to give your entryway the upgrade it deserves?
Let’s jump right in!
Why Choose a Pine Cone Door Hanger for Home Decor
I’ve always been drawn to decorations that bring a touch of nature indoors, and pine cone crafts absolutely nail this vibe.
These little woodland valuables are literally free for the taking during your next neighborhood walk or forest hike. No need to drop cash at expensive home décor stores when Mother Nature’s giving away premium materials!
Beyond being budget-friendly, pine cones are incredibly versatile. They work beautifully for any season—leave them natural for an earthy autumn feel, add some sparkly paint for winter magic, or incorporate pastel accents for spring. I’ve used them year after year by simply switching out ribbons and embellishments to match the season or my mood.
What I love most is how these natural beauties instantly warm up your entryway. There’s something so welcoming about handcrafted décor that mass-produced plastic items just can’t match.
Your door hanger becomes a personal expression of your style while creating that perfect first impression for anyone who visits your home.
Tools and Materials Needed for Crafting a Pine Cone Door Hanger
| Tools | Materials |
|---|---|
| Pair of pruners | Thick rope (for the base) |
| 24-gauge paddle wire | Pine cones (approximately 30) |
| Scissors | Arborvitae greens (optional) |
| Wire cutters | Winterberry holly (optional) |
| Bow-making wire | Festive ribbon |
| Small wire for greens |
Crafting a Pine Cone Door Hanger: Easy Instructions for Anyone
Step 1: Prepare the Base

First, begin by taking a thick piece of rope.
Then, tie a small loop at the top to ensure you can easily hang your swag from a door hook or wreath hanger.
Finally, cut the rope slightly longer than needed to give you enough room to adjust the length later. This loop will be where your hanger hangs from.
Step 2: Wire the Pine Cones
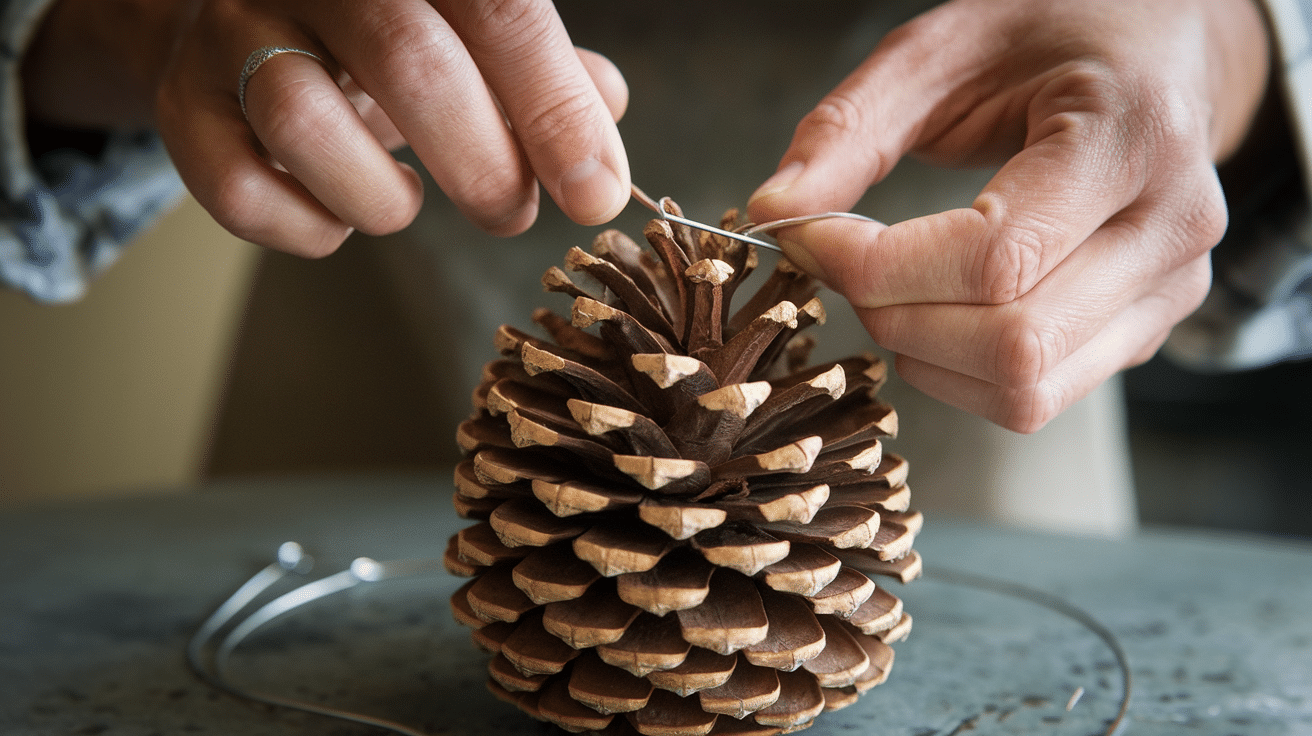
To wire each pine cone-
- Start by cutting a small piece of 24-gauge paddle wire (around 6-8 inches long).
- Carefully loop the wire around the top of the pine cone, just beneath the scales.
- Then, twist the wire tightly to secure it in place, ensuring the wire isn’t visible when it’s attached to the rope.
The wire should be tight enough to hold the pine cone firmly but not so tight that it bends the shape. Leave enough wire at the end to attach the pine cone to the rope easily.
Step 3: Attach Pine Cones to the Rope
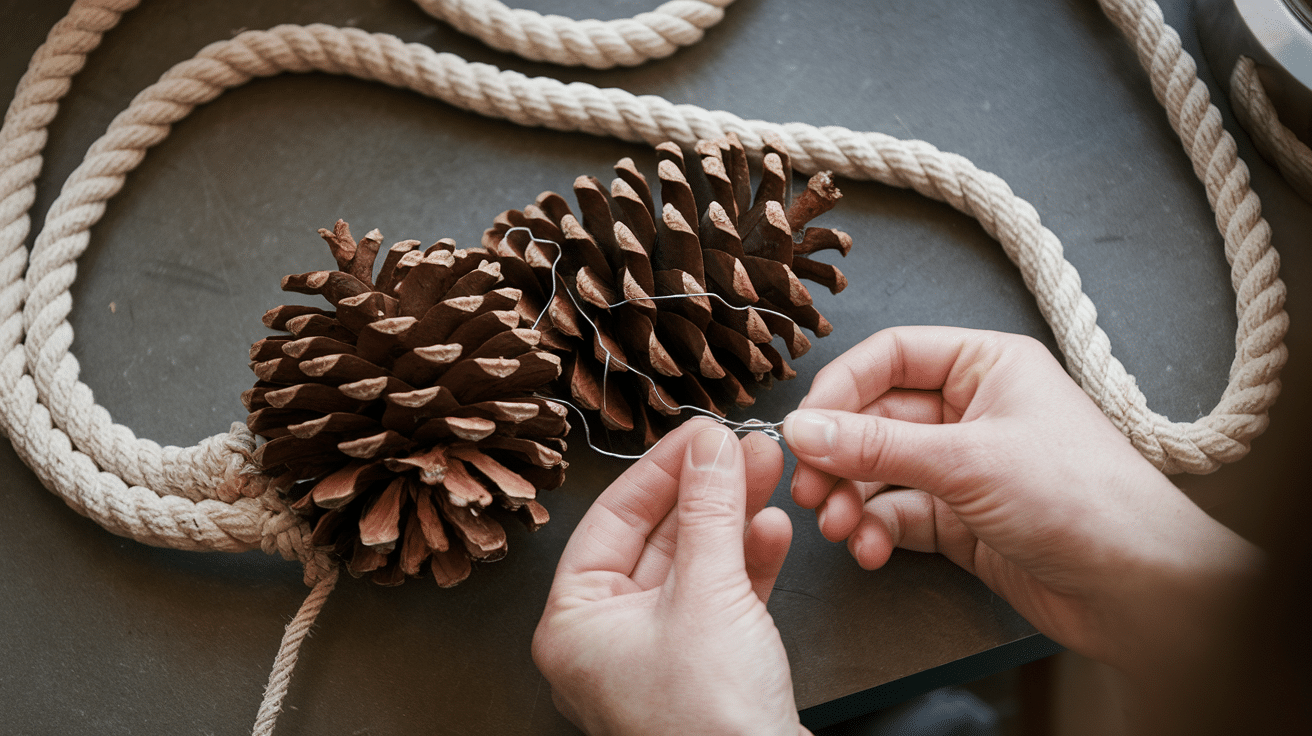
Once you have your wire attached to the pine cones, it’s time to secure them to the rope base.
Take the wire from the pine cone and place it against the rope where you want to attach it.
- Twist the wire tightly around the rope to ensure a firm hold. It’s important to wrap the wire several times to make sure the pine cone doesn’t shift or fall off.
- As you work, pay attention to the spacing between each pine cone. You can leave slight gaps for a natural, slightly uneven look or place them closer together for a denser swag.
- For a more layered effect, place the pine cones in a triangular formation, with the smaller ones toward the top and lthe arger ones toward the bottom. This adds dimension and a more balanced shape.
- Keep adjusting the pine cones as you go, making sure the wire is hidden and the swag looks fuller and more natural.
This step sets the foundation for the swag’s final appearance, so be patient and adjust as needed for an even, flowing design.
Step 4: Position the Pine Cones
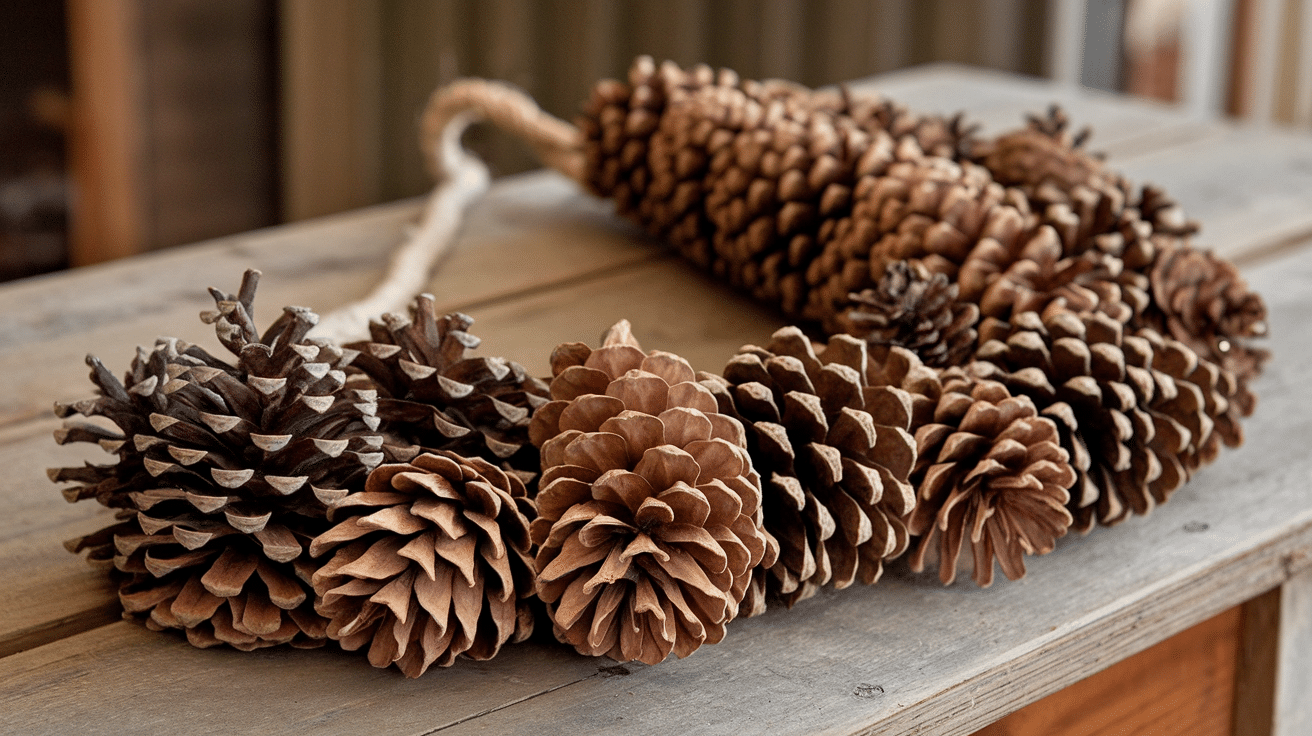
As you continue adding pine cones, consider their placement for a natural look. For this, start with larger pine cones at the base of the swag, progressively using smaller ones toward the top.
Then, arrange the cones in a way that the rope is hidden and the pine cones overlap slightly for fullness.
You may need to adjust their position as you work, making sure the swag has a balanced shape.
Step 5: Add Decorative Greens
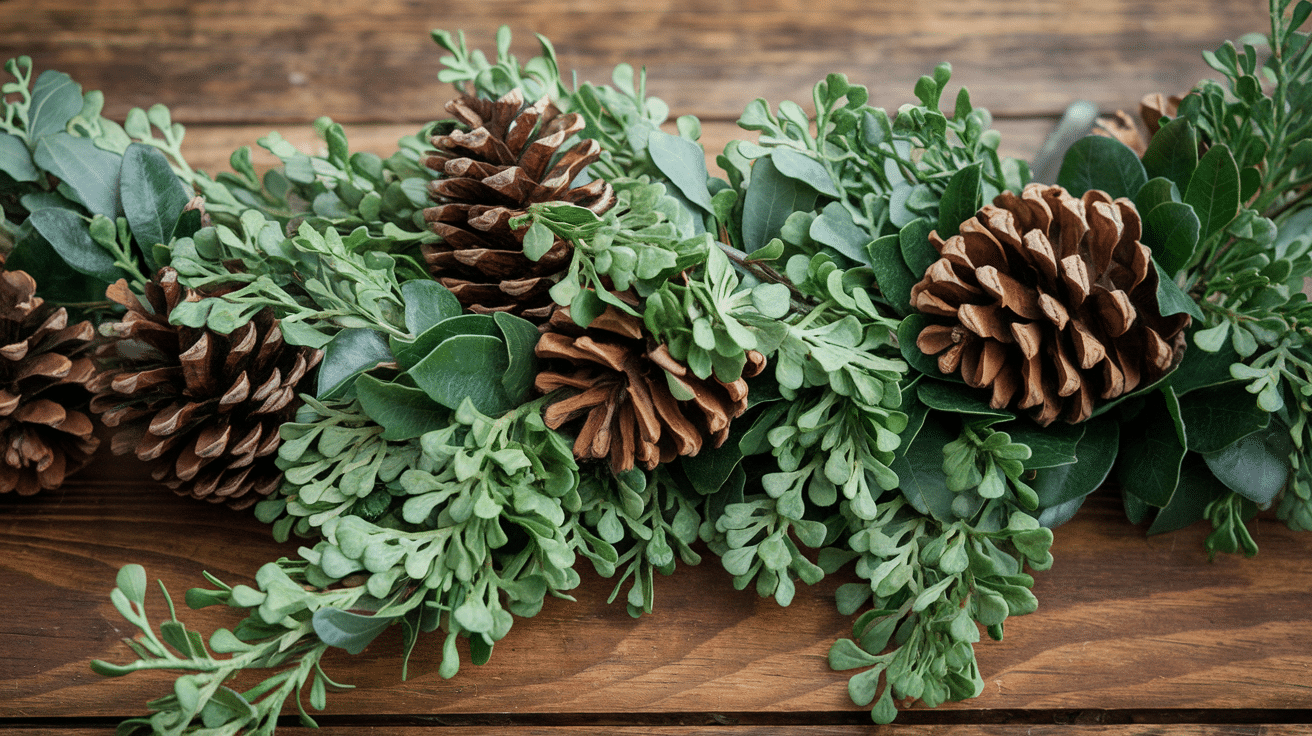
The addition of decorative greens takes your swag to the next level by filling in gaps and enhancing its lush, festive appeal.
Use soft green foliage like arborvitae or any other greenery that complements the natural look of the pine cones.
- Cut small sections of greenery, about 4-6 inches in length, to keep it manageable. Start by wiring the greenery into the rope between the pine cones.
- Secure each piece of greenery by twisting the wire tightly around its base and the rope. Make sure the wire is hidden and the foliage is securely attached.
- Position the greens in a way that drapes naturally and evenly, allowing some to hang loosely while tucking others closer to the rope for a balanced effect.
Don’t overcrowd the swag with greenery—let the pine cones remain visible while the greens fill in the space, adding texture and a lively contrast to the neutral tones of the cones.
This step will give your swag a fuller appearance and create a graceful flow that adds to its beauty.
Step 6: Add Optional Decorative Elements
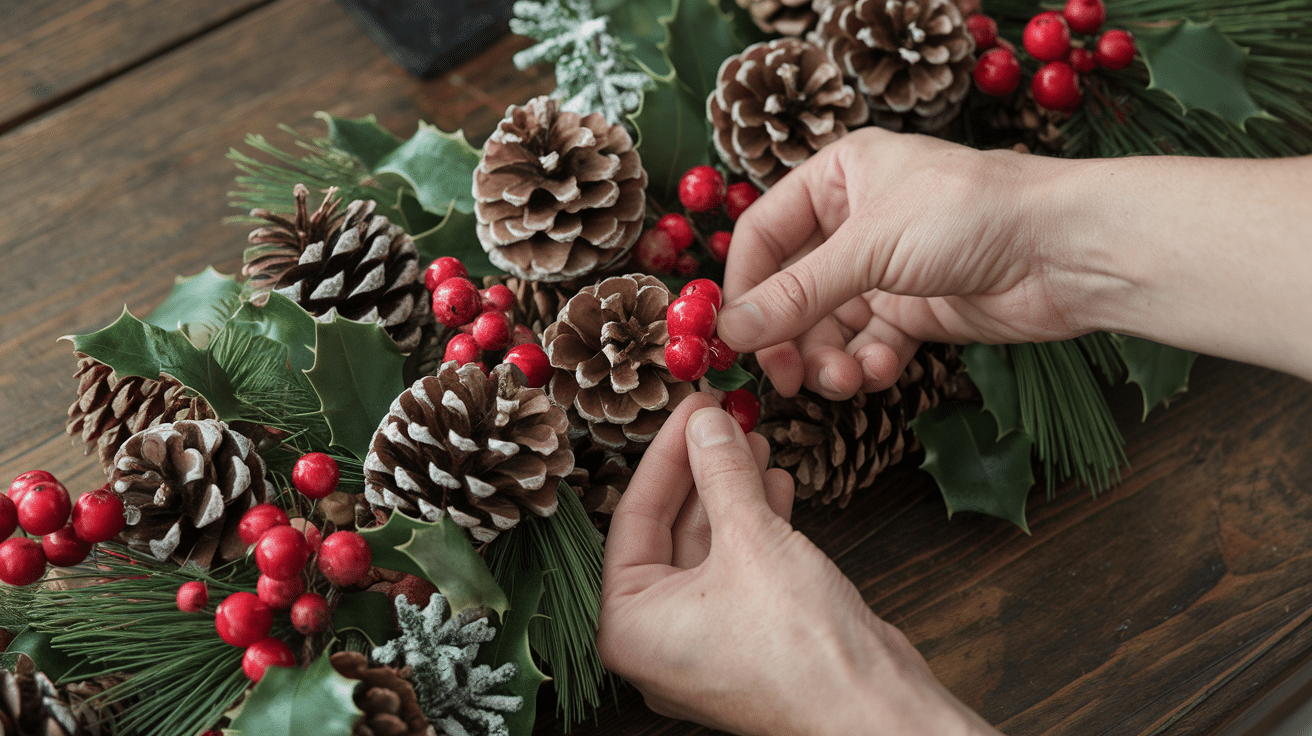
For extra flair, you can add berries, like winterberry holly, to your swag.
Wire them in the same way as the greens, ensuring they are spread evenly throughout the swag for color contrast.
You can add as many or as few berries as you like, depending on how lively you want the swag to appear. A few berries scattered throughout will make a lovely accent, or you can add more for a bolder, brighter look.
Step 7: Attach the Ribbon and Final Adjustments
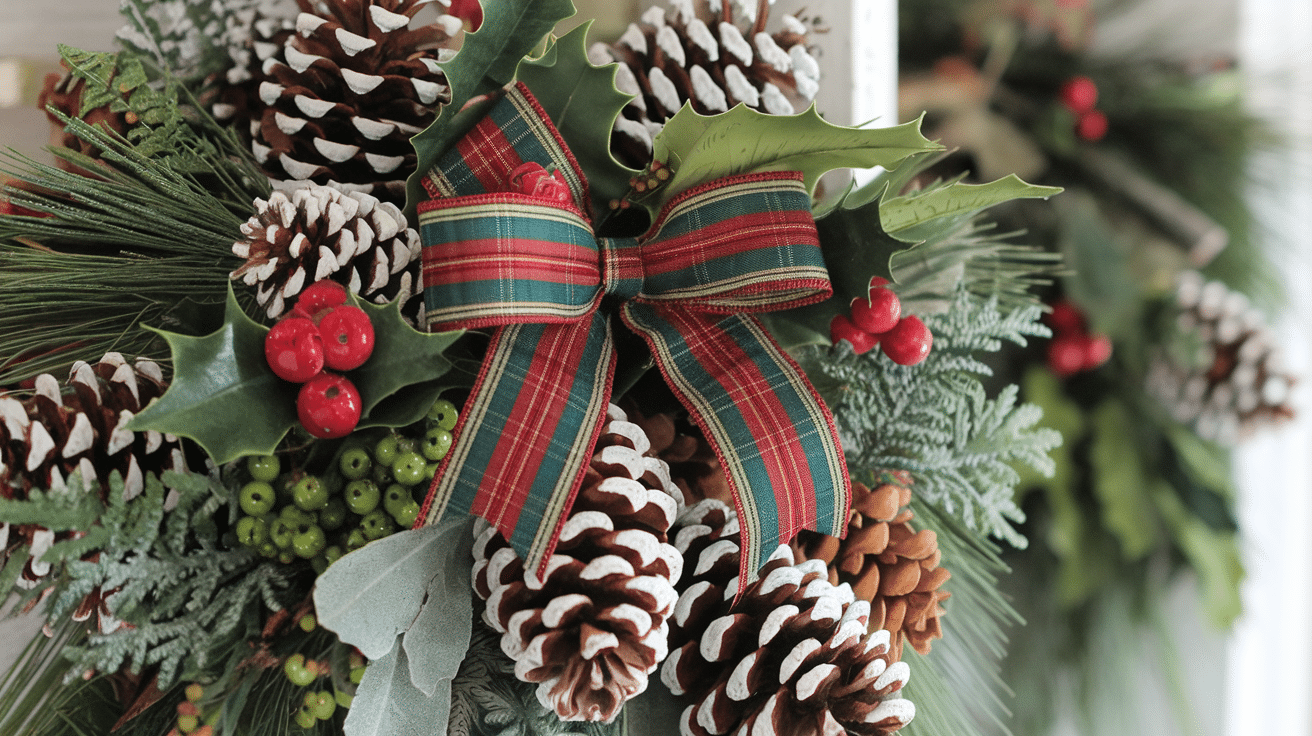
Create a small bow with festive ribbon. Use a piece of wire to secure the bow at the top of the swag, just below the loop.
Adjust the bow’s loops and tails to your liking.
Once everything is in place, hang your swag and make any final adjustments to the pine cones and greens to perfect the look.
For a more detailed tutorial on how to craft a pine cone door hanger at home, check out the video below:
Nature-Inspired Home Accents: Fun Pine Cone Door Hanger Ideas
I’ve fallen in love with using pine cones as natural decor, and these door hanger ideas are my absolute favorite way to welcome guests! There’s something magical about bringing these woodland treasures into your home, and I can’t wait to share these simple yet stunning ideas with you.
1. Classic Rustic Pine Cone Swag
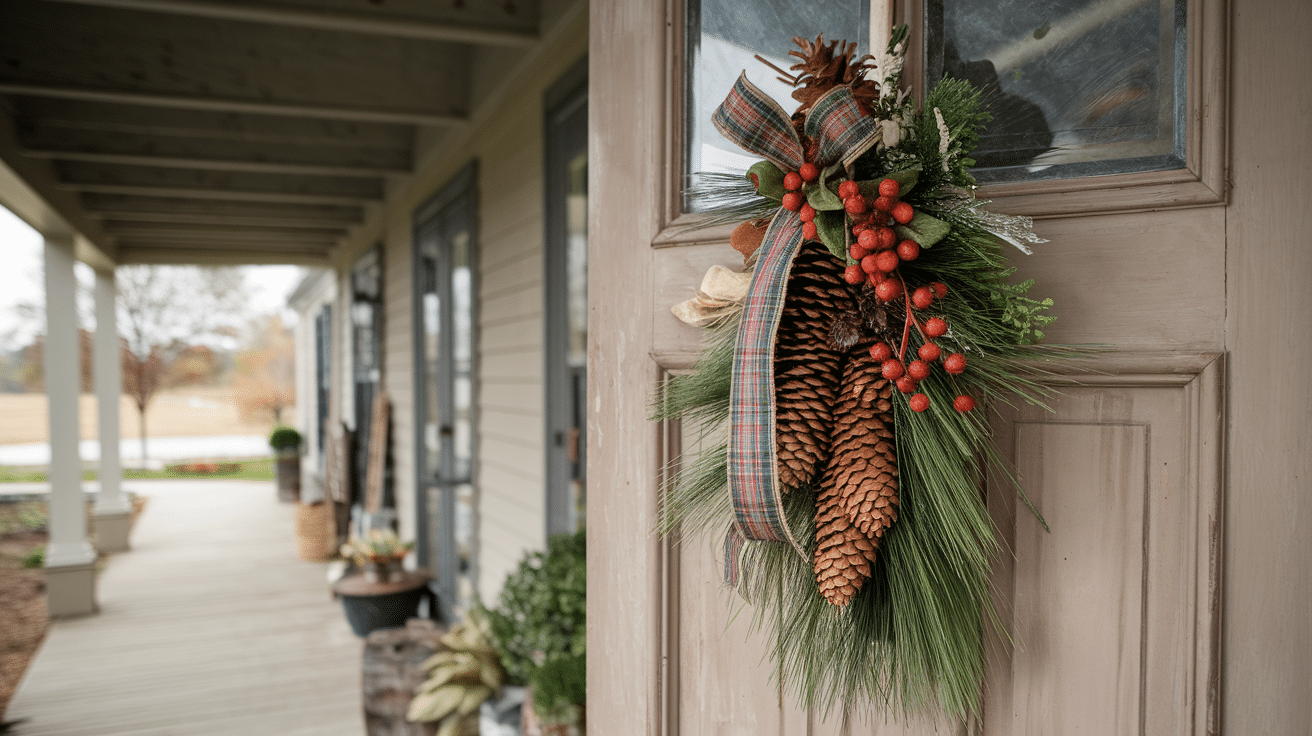
- Placement Suggestions: Hang this swag on a front door, mirror, or above a fireplace mantle for a welcoming touch. It works well for rustic or farmhouse-style decor.
- Customization Options: Add faux berries, small pine branches, or a bow in plaid or burlap ribbon for extra warmth. You can also experiment with metallic spray paint on the cones for a more festive look.
- Budget Range: $15 – $70
Like what you see? Buy it here: Fir Swag with Pinecone
2. Winter Wonderland Pine Cone Door Hanger
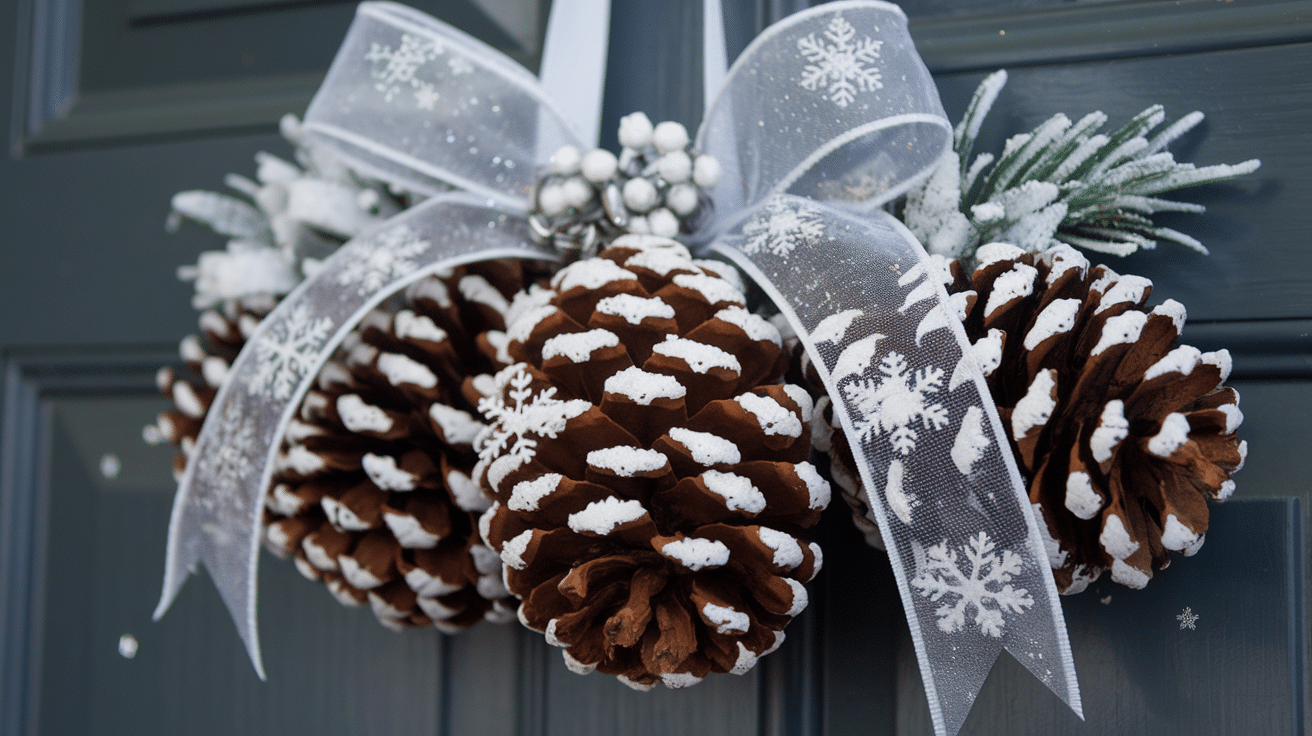
- Placement Suggestions: This style fits perfectly in an entryway, front door, or even a holiday-themed window display.
- Customization Options: Use white or silver ribbon and artificial snow on the pine cones for a wintery feel. You could also add small snowflakes or glitter to give it a frosty, graceful look.
- Budget Range: $10 – $40
Like the idea? Buy it here: White tip pine cones
3. Whimsical Woodland Pine Cone Decor

- Placement Suggestions: Ideal for outdoor spaces such as porches, patios, or garden gates, bringing a bit of nature indoors or outside.
- Customization Options: Incorporate natural elements like moss, acorns, or feathers for a whimsical touch. Bright ribbons or bows can add a playful vibe.
- Budget Range: $25 – $50
4. Minimalist Modern Pine Cone Hanger
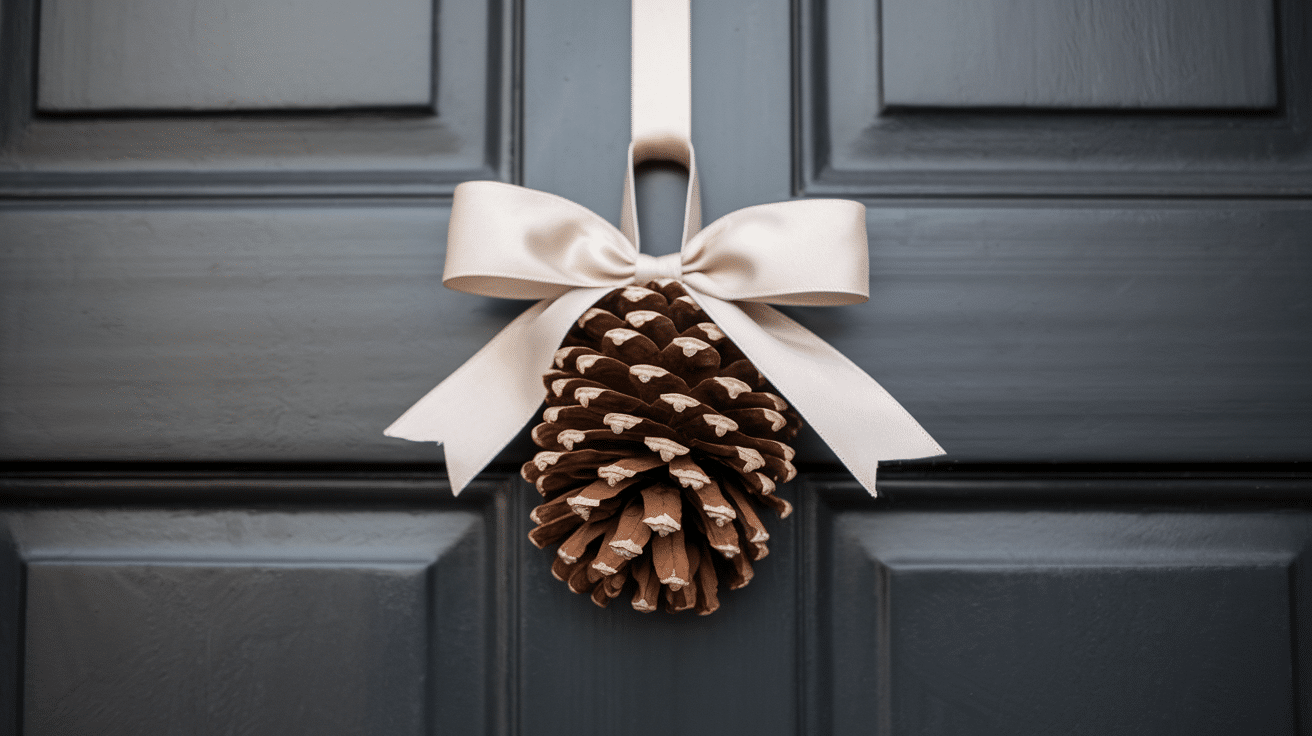
- Placement Suggestions: This design fits well in minimalist spaces, such as modern urban homes or apartments, especially when placed on sleek front doors.
- Customization Options: Stick with neutral colors like white, gray, or black for the ribbon.
- Budget Range: $15 – $25
5. Holiday Glam Pine Cone Swag
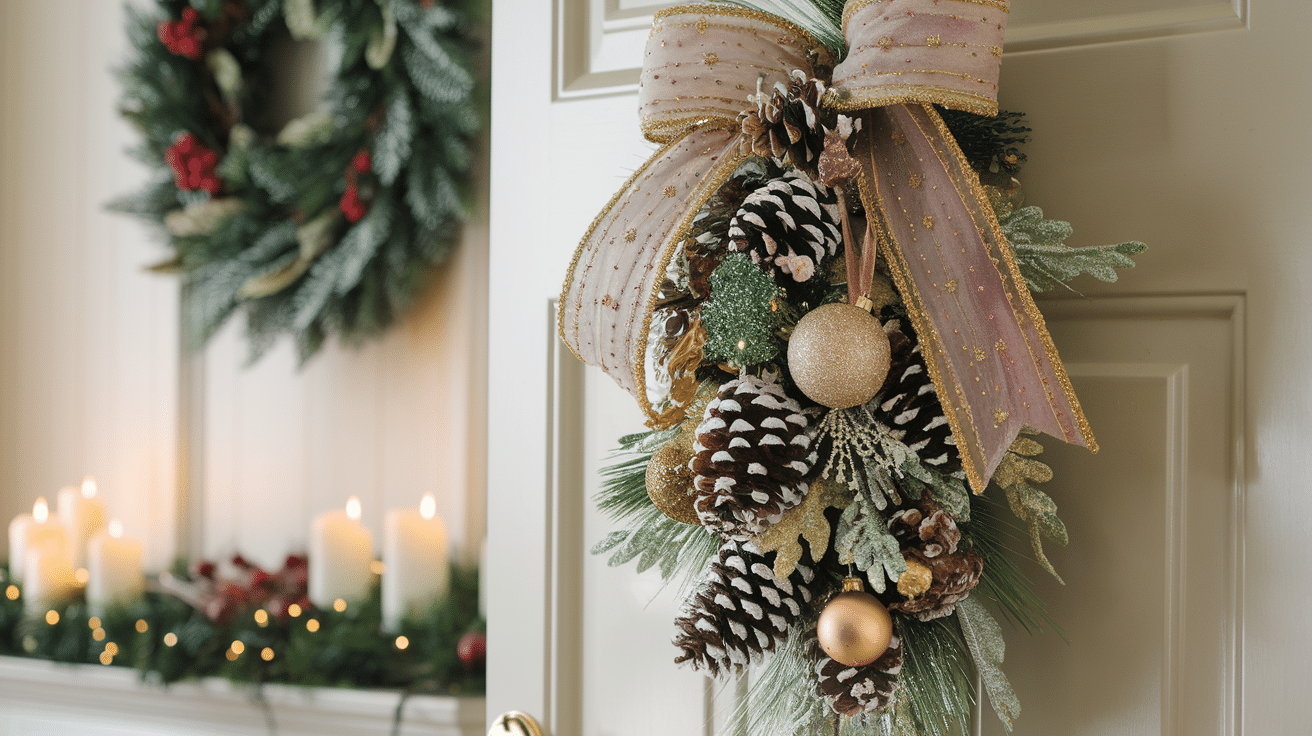
- Placement Suggestions: Perfect for holiday parties, this stylish swag works on doors or even as part of a holiday centerpiece on a dining table.
- Customization Options: Add gold or silver accents, glitter, and a luxurious ribbon to upgrade the look. Small ornaments or holiday baubles can be added for a festive flair.
- Budget Range: $50 – $200
Like what you see? Buy it here: Christmas pine cones swag
Disclaimer: The products mentioned above are based solely on personal experience and are not sponsored or affiliated with any brands.
Preserving Pine Cone Door Hangers: A How-To
Finding the perfect pine cones for your door hanger is just the beginning—you’ll want them to last for years to come. After collecting dozens of these natural beauties over the seasons, I’ve learned a few tricks to ensure they stay looking their best.
Here’s how I preserve my pine cone door hangers:
Clean them thoroughly:
Before anything else, I gently brush off any dirt, debris, or tiny critters hiding inside.
For stubborn grime, I’ll swish them in a bowl of warm water with a splash of vinegar, but be careful—soaking them too long can make them close up!
Bake to eliminate bugs:
Nothing ruins a beautiful door hanger faster than unwelcome insects. I spread my pine cones on a foil-lined baking sheet and pop them in the oven at 200°F for about an hour.
This eliminates any hitchhikers and opens the cones fully.
Seal with clear polyurethane:
To protect against humidity (which can make pine cones close up) and general wear, I apply a light coat of clear polyurethane spray.
I make sure to hit all the nooks and crannies while working in a well-ventilated area.
Apply protective wax:
For extra protection against moisture, I sometimes rub a thin layer of beeswax over the pine cones. This adds a subtle shine while creating a barrier against dampness and dust.
Store properly in off-seasons:
When not displaying my hanger, I wrap it loosely in tissue paper and store in a cardboard box in a cool, dry place—never plastic, which can trap moisture and cause mold.
Touch up yearly:
Every season, before hanging them, I dust them off and apply a fresh coat of sealant if needed.
Ribbons and decorative elements might need replacing, but the pine cones themselves should last for many years with proper care.
Wrapping It Up!
Ready to bring natural beauty to your doorstep?
This pine cone door hanger project is more than just a craft—it’s your opportunity to welcome guests with a personal touch that changes with the seasons. I’ve hung mine for three years now, switching ribbons from harvest oranges to holiday reds to springtime pastels.
Remember, the best part of DIY projects isn’t just saving money (though that’s nice, too!)—it’s the satisfaction of creating something unique with your own hands. Your entryway tells visitors a story about who you are before they even step inside.
Like what you see, check out more DIYs like “DIY Vintage Picture Frame: A Comprehensive Tutorial” on our page.
So grab those pine cones, gather your supplies, and spend an afternoon crafting. Your door is about to become the most inviting one on the block!